Edit a Label Template
To edit an existing label, click the name of the label and a new page will open like the one below, from here you can edit the attributes.
*There is no restore option after deleting a template, you will need to start again using Add Template.
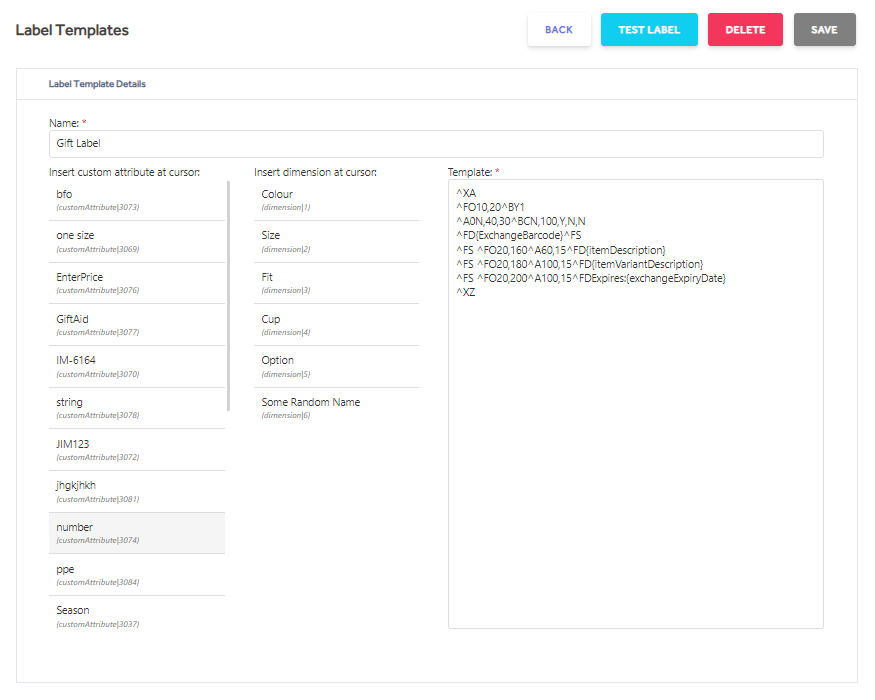
Back - Takes you back to the Overview page.
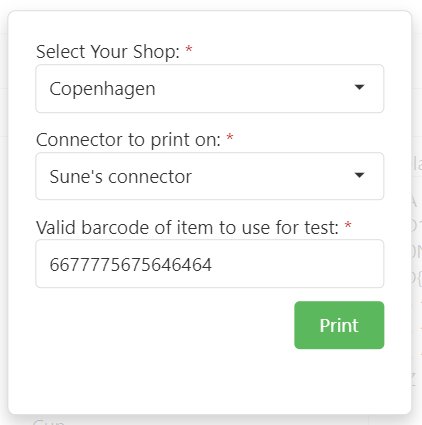
Test Label - Select Test Label from the top menu of the open design.
Select a Shop - This will be the shop where your barcode printer is located.
Select the Connector - This is the connector your barcode printer is attached to.
Valid Barcode – Key or Scan in the barcode of an item.
Print – Sends the template design and item details to the barcode printer.
Delete - After a Save, you can delete your template if not required.
Save - Saves any changes made to the Label Template
Variables
You can enter the following variables, including the {curly brackets}, in the ZPL template. These variables will link to the data for the item you are trying to print and will be converted to ZPL commands, such as Field Data (^FD), before being sent to the printer. The variable names are case sensitive. If a value cannot be found for a specific variable, then no data will be printed on the label.
{barcode} - as listed for each item as the Barcode in the Matrix tab of an Item.
{currency} - default currency designator of the tenant in ISO 4217 format.
{customAttribute|<customAttributeId>} - see Custom Variable / Dimension / Sales Price for formatting details.
{dimension|<dimensionSequence>} - see Custom Variable / Dimension / Sales Price for formatting details.
{discountAmount} - see Discount Labels in Item Management. This variable will show the value shown in the Value field when Type Value is selected.
{discountPercent} - see Discount Labels in Item Management. This variable will show the value shown in the Percentage field when Type Percentage is selected.
{itemDescription} – as listed for the Item in the Matrix tab under Description.
{itemManufacturerItemNumber} – as listed for the Item in the Matrix tab under Manufacture Item No.
{itemName} – as listed for the Item in the Matrix tab under Name.
{itemNo} - as listed for each item as the Item No in the Item List. See Details for further details especially as this number cannot be altered after item creation.
{itemVariantDescription} – is system set at item creation. It is a concatenation of Dimension names set against the item. See the {dimension|<dimensionSequence>} variable for individual elements.
{itemVendorItemNumber} – as listed for the Item in the Matrix tab under Vendor Item No.
{price} – as listed for the Item in the Matrix tab under Sales Price. This is always in the default currency, for alternative currencies see the {salesPrice|<currencyCode>} variable.
{salesPrice|<currencyCode>} - see Custom Variable / Dimension / Sales Price for formatting details.
{textLine} – used by the system for arbitrary data, such as the Text field in Discount Labels. Not user configurable.
{currentprice} – This displays the current price via the POS within the Item lookup list. NOTE: The Price may be affected by PPE Price Changes and can differ from the {salesPrice|<currencyCode>} due to time based price changes.
{itemVendorName} – the assigned Vendor in the Summary tab of an Item.
{masterItemNo} – prints the Master Item Number as shown on the Summary tab for the item.