Summary Tab
The Summary tab allows you to view and edit the Master Item Information.
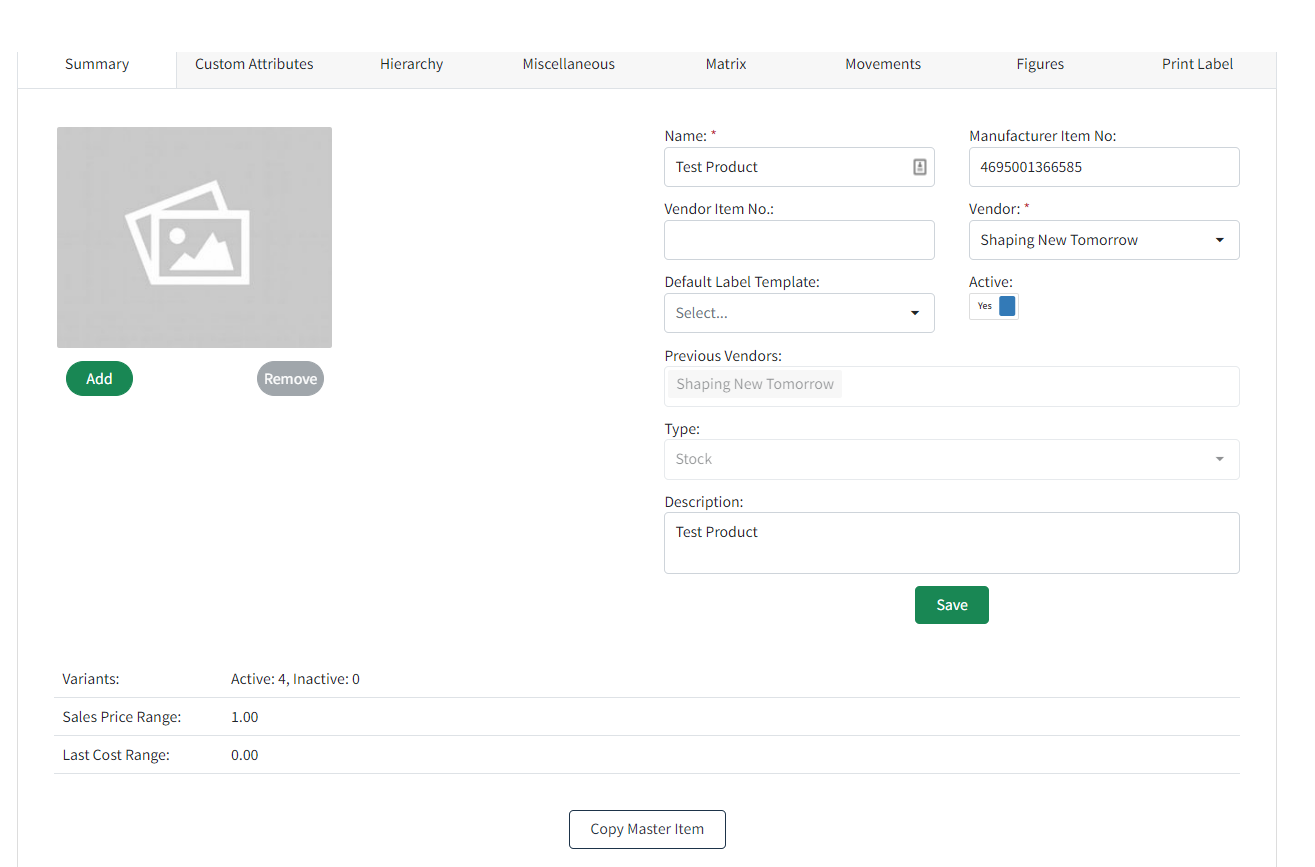
Summary Header - This is made up of the Item Name and Master Item Number, as shown on the Item list.
Name - This is the Master Item Name. Used by the Item List and by parts of Imagine where the items are listed at Master Item level instead of variant level [Colour and Size].
Manufacturer Item No - This is the manufacturer item number at Summary level. [This can be different at variant level]
Vendor Item No - This is the Vendor Item number at Summary level. [This can be different at variant level]
Vendor - This is who supplies the item. Sometimes referred to as the Supplier.
Default Label Template - This is the label format which will be used for label printing unless an alternative format is selected at the time of printing.
Active - This is where you can set an item to be Active or Inactive. At summary level, this is for all variants that belong to the item. To make individual variants active or inactive, use the option on the matrix tab against the variant.
- An inactive item may be excluded from certain parts of the system.
- Inactive items can be made active again at a later date.
Previous Vendors - This field shows the previous Vendors that the item was assigned to. For reference purposes.
Type - This is to distinguish if this item is stock or sample.
Description - This field is an extended description of the Name field and is commonly used to hold more descriptive information about a product. Material type, weight, size, artist information, design notes etc. This field may appear as the items description in some parts of Imagine, but this is being changed to use the shorter Item Name field. [This can be different at variant level]
Save - This saves all information belonging to the Master Item Summary tab
Variants - This shows how many Active and Inactive variants belong to the Master Item. Clicking on the Edit Pencil on the right will take you straight to the Matrix tab where you can view and edit the variants.
Sales Price Range - This shows the highest selling price and the lowest selling price of the variants within the item. If only 1 price is shown, then all items are that selling price. Clicking on the Edit Pencil on the right will take you straight to the Matrix tab where you can view and edit the variants.
Last Cost Range - This shows the highest cost price and the lowest cost price of the variants within the item across locations. If only 1 cost is shown, then all items are that cost price.
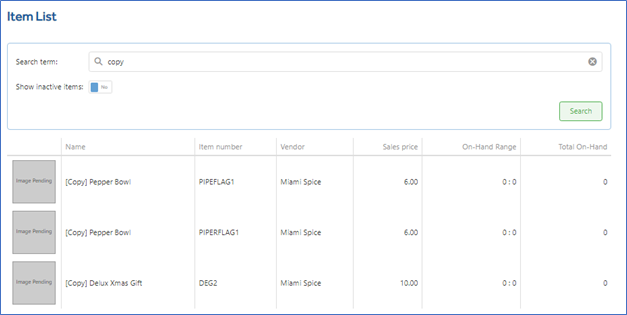
Copy Master Item - This is a quick way of creating an item based on an existing item, especially if most of the field information is the same. After choosing Copy Master Item you will be prompted for a new Master Item number. Fill in as required or if left blank, it will use the next available system item number. The green Copy Master Item button will create a copy of the item.

Important: The copied item is now ready and requires some attention. Specifically, the Item Name field on the Summary and Matrix tab as they will have the word [Copy] added to the start of the original Item Name. Amend any other fields as required.
Helpful Tip! To find the copied item quickly, type the word Copy into the search bar.
Additional Information
Once an item has been created, any amendments on the Summary tab are for the Summary tab only. Where there is a corresponding field on the Matrix tab, it must be amended separately as its possible for these variants to have different information by colour, size etc. [The fields are Manufacturer Item no, Vendor no, Image URL, Name and Description].