Customers
The Customers page gives you a list of any current customers entered into Imagine for your tenant, the search box allows for quick filtering on any text entered and new customers can be added via the button to the top right of the list.
Adding a New Customer
To add a new customer use the 'Add New Customer' button
This will open the following page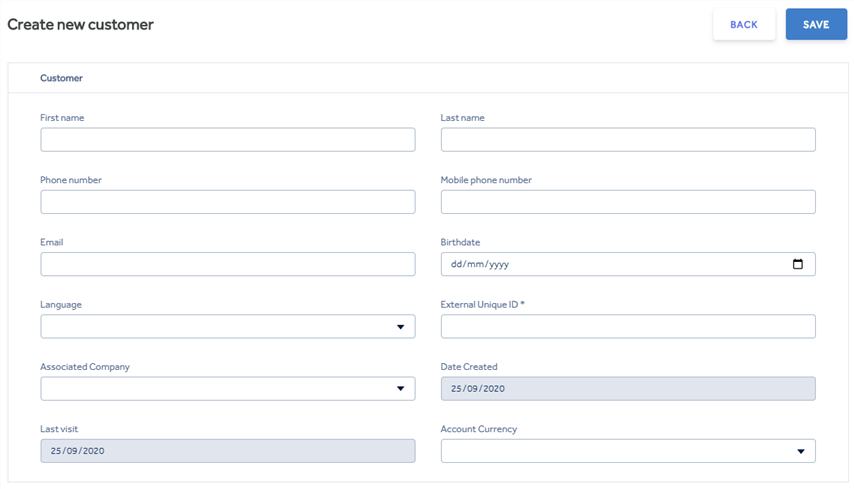
Fill out the fields the customer is happy to give details for and then save.
Fields :-
- First Name*
- Last Name*
- Phone Number - see Settings in regards to E.126 format
- Mobile Phone Number
- Email - must be a valid email address if entered, otherwise leave blank
- Birthdate - dates available run from 1/2/1900 through to today's date. You cannot set a birthdate for a future date
- Language
- External Unique ID* - this is the Customer Number you allocate, it is used on the POS and Receipts.
- Associated Company - Imagine allows you to create company accounts, you can link the customer record to a company one.
- Date Created - when the account was created
- Last Visit - when the customer was last made a purchase in store
- Account Currency* - the currency the customer keeps their account in, any transactions in another currency will be converted to this one
Editing a Customer
To edit a customer click on their record in the list.
This will open the customer record on the Details page, this is the same fields as shown above in Adding a New Customer. If changes are made here they can be saved by clicking Save in the top right, a toaster will appear to signal this has been completed.
![]()
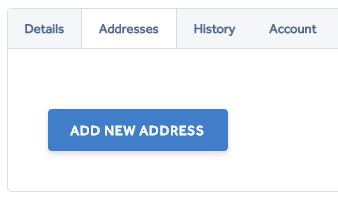
Adding Customer Address
To add a new address to the customer record switch to the Addresses tab and select Add New Address.
This will open a New Address box with the following fields.
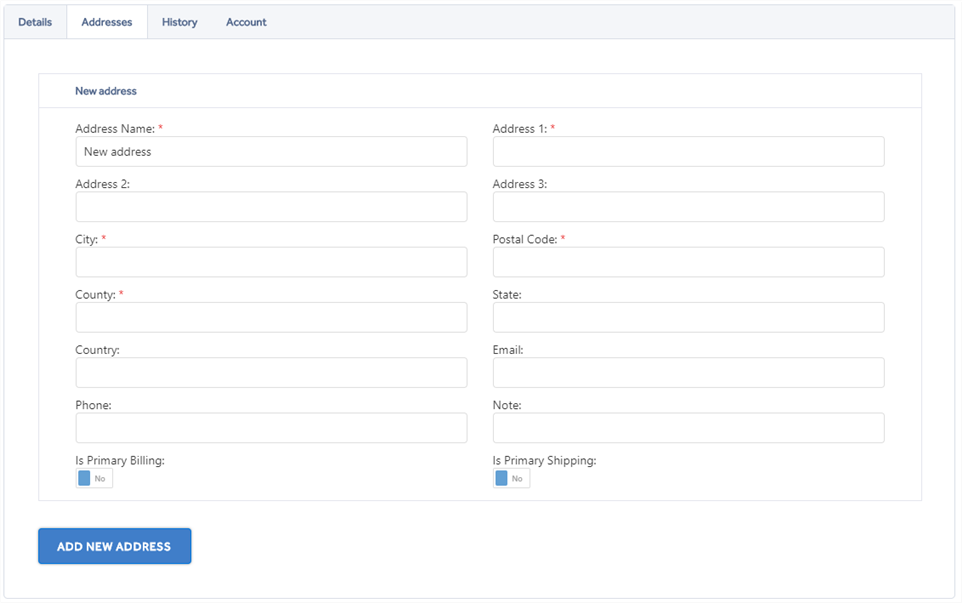
Fill out the address with at least the minimum required fields as indicated by the red asterisk. *
It is possible to add more than one address and the toggles at the bottom of the form can be used to state whether an address is the Primary Billing address and/or Primary Shipping address.
Once the address(es) have been added click Save at the top right of the form, a success toaster will appear to indicate these have been saved to the Customer.![]()
Viewing Customer Transaction History
The Transaction History tab will allow you to view a Customers Transaction History between two given dates.
Sales Statistics
- Total Sales Value: the total amount a customer has spent with your business
- Total Discount Value: the total amount of monetary value a customer has been given in discounts
- Remaining Credit Voucher Amount: all outstanding Credit Voucher balances the customer has still to redeem
- Number of Visits: the number of transactions recorded for this customer. This depends on the customer being selected at the PoS when a transaction is being performed
- Last Visit Date: the most recent date this customer was recorded on a transaction in any of your shops

Receipts
You can search for a transaction or range of transactions here. For an individual transaction you can enter in the Receipt Barcode which will look like R0001-001-000001. This can be found on the printed receipt or by using the Find Receipt function on the PoS
Alternatively, you can enter a range of dates where you do not know the specific transaction.
Press Load when you are ready to search for the transactions. Any matching transactions will show in the columns below.
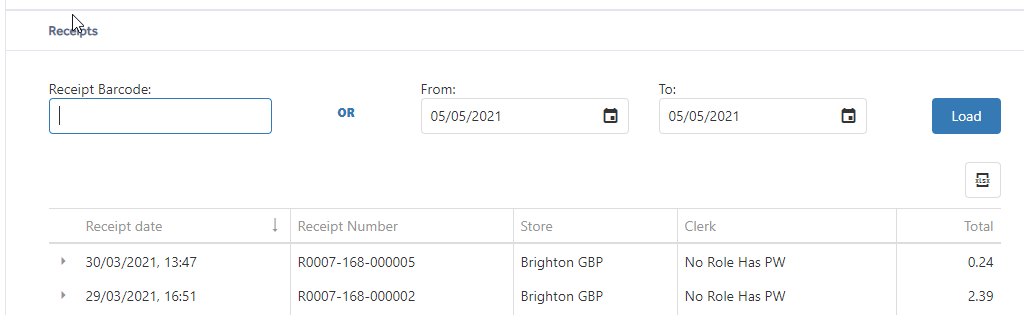
Receipt Date: the date and time of a particular transaction
Receipt Number: this is the number shown on the individual printed receipt to identify the transaction
Store: the shop the transaction took place in
Clerk: the name of the clerk who was logged on the PoS at the time of the transaction
Total: The total monetary spend by the customer for this transaction
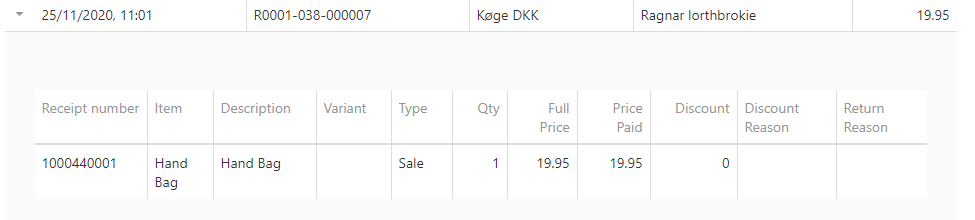
For each individual line you can expand the transaction to see the transaction specific detail. This includes
Receipt Number: this is the Barcode for the item as shown in Inventory - Matrix
Item: the items Name
Description: the item’s Description
Variant: any dimension details for the item such as size or colour
Type: the type of transaction this was such as Sale or Return
Qty: the quantity of this item sold on this line of the transaction
Full Price: the Sales Price of the item at the time of the sale
Price Paid: the price the customer paid for the item
Discount: the value of any discount the customer had on this line of the transaction
Discount Reason: the Discount Reason Code the clerk selected for this line or transaction
Return Reason: the Return Reason Code the clerk selected for this line or transaction
Note: Reason Codes are listed in Back Office – Reason Codes
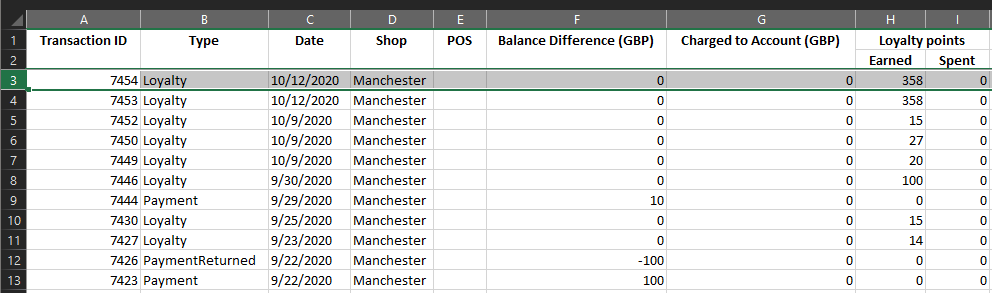
View Customer Account
The Account tab presents all the details for the Customers account, this includes Balance and any Credit Limit, Loyalty Scheme participation if running and a Transaction History for the account.
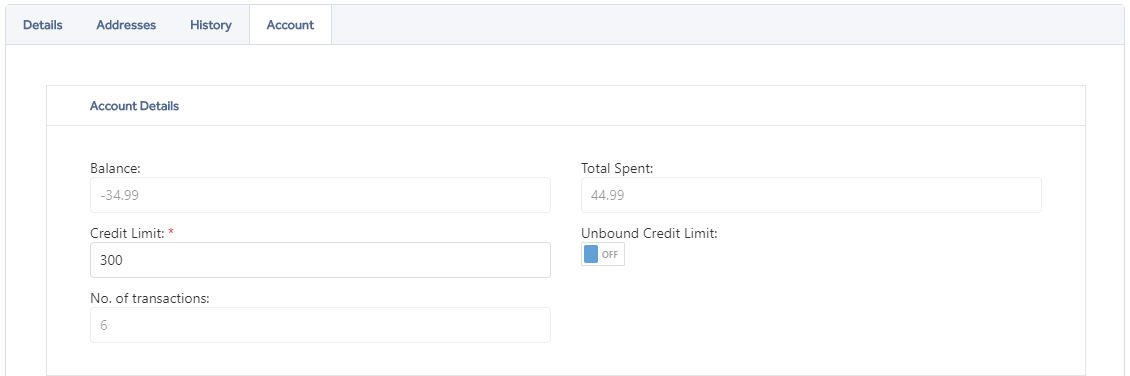
- Balance - Customers current balance, this is the difference between any deposits and charges to the account.
- Total Spent - The total charges to the account since creation.
- Credit Limit - The total amount that can be charged to the account before any deposits are required.
- Unbound Credit Limit - The Customer may charge purchases to their account without limit.
- No. of Transactions - Transactions on the account, this includes charges to the account and deposits, it doesn't include transactions paid for off account.
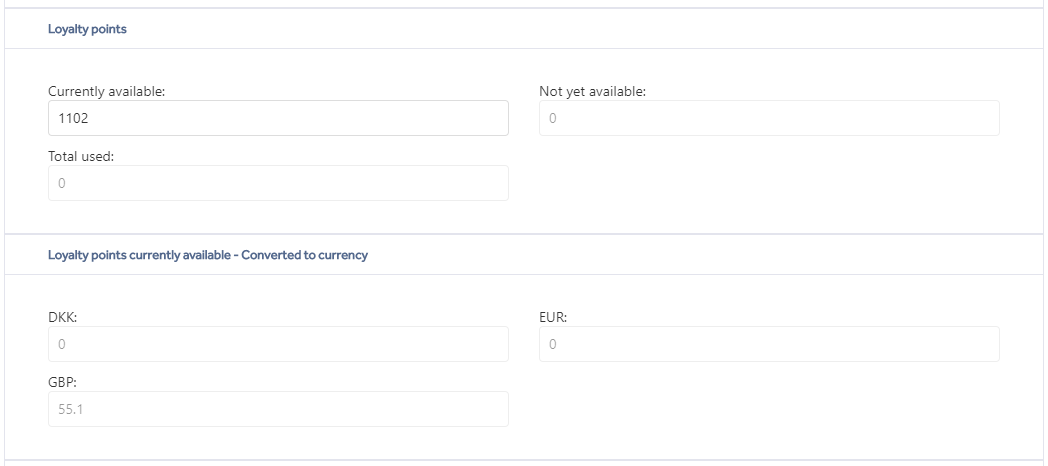
- Currently available - The current points accrued on the account yet to be spent.
- Not yet available - These are the accrued points that have yet to pass any quarantine period as set in the loyalty configuration.
- Total used - The total number of points used against purchases.
The loyalty points converted to currency section shows you the conversion of points to the tenant currency at the rate set within the loyalty configuration.
Transaction History shows you any activity against the customers account, so any transaction that may affect the balance or loyalty points if relevant.
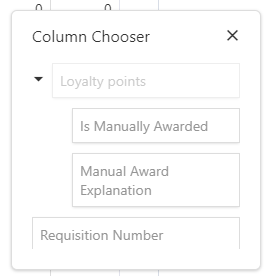
The columns in the data grid can be customised via the column chooser button ![]() this will open a box with a list of columns, you can then drag and drop columns on or off the grid.
this will open a box with a list of columns, you can then drag and drop columns on or off the grid.
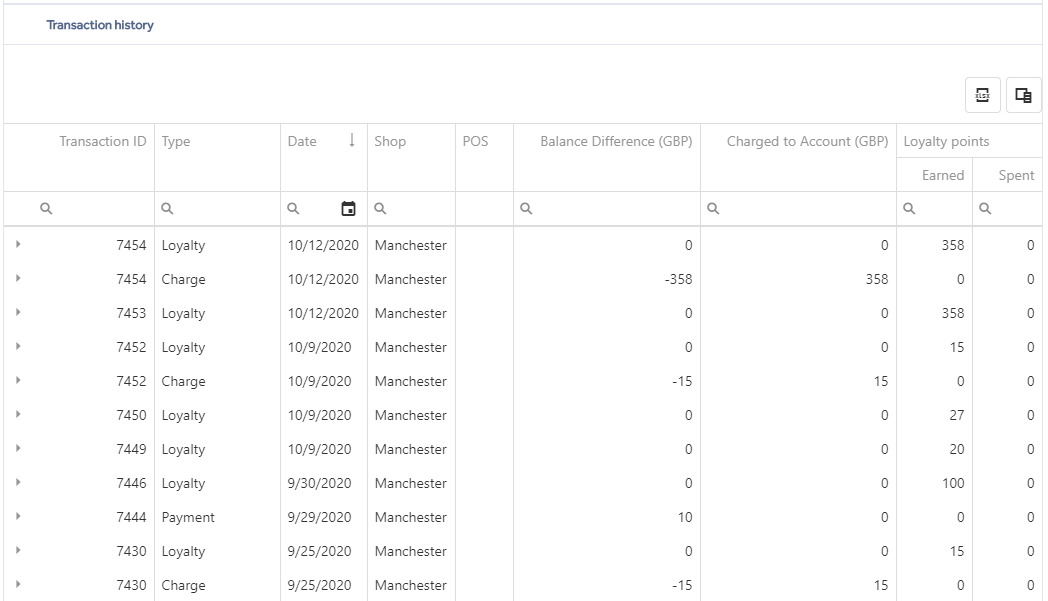
The data grid offers sorting on the columns and filtering.
Sorting:
To sort in ascending or descending order just click on a column header, an arrow will indicate the sort order as shown in the Date column above.
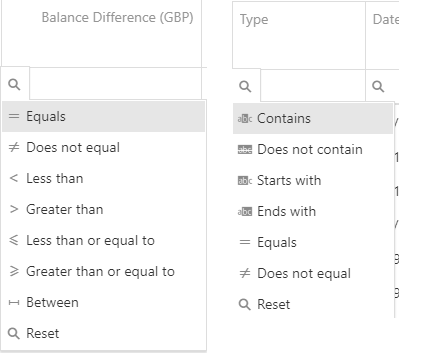
Filtering:
To filter on a column enter the text that you want to filter by into the search box under the column header, e.g. to see only charges on an account enter the text 'charge' as shown below.
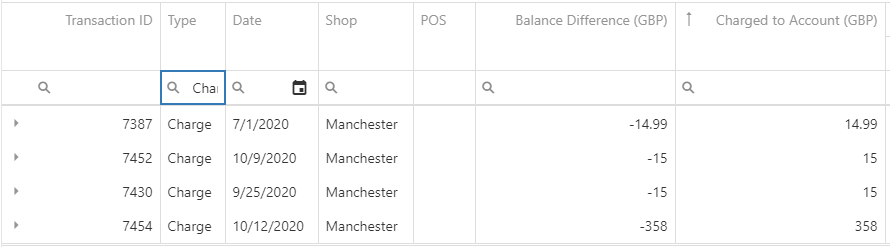
There are options for the filter which can be accessed by clicking on the magnifying glass to open the menu, these offer more flexibility in your search and change depending on the column data type.
Lastly there is the option to export the transaction history for the account to an excel spreadsheet via the 'Export to Excel' button. 
Note: This option will export the data as shown, if you have filters in place the data exported will also be filtered so if you want all data remove the filters first.