Connector Setup
The Connector is an ARM Device which serves as a POS Hardware station. It allows a browser to print to POS Printer and Cash Drawer, and is also known as a POP (Point of Payment).
The Connector supports two types of Printer. The K3 DdD manufactured printer, and the Epson T88V printer.
It supports any Epson compatible cash drawer connected to the same printers.
Connect the Printer to the Connector using the Serial connector and USB to Serial adapter. Ensure the printer has some paper loaded into it.
Connect the Cash Drawer to the Printer using the DK cable into the DK port on the printer.
Connect the Network cable from the Connector onto your network. Your network must support DHCP and allow the device to be assigned an IP address that has outgoing Internet access.
Connect the power to the connector.
After a few minutes, the Connector will connect to the Internet, check into the K3 servers, and then print a status report. It will give you the Unit ID and IP address so you can configure this in the Portal.
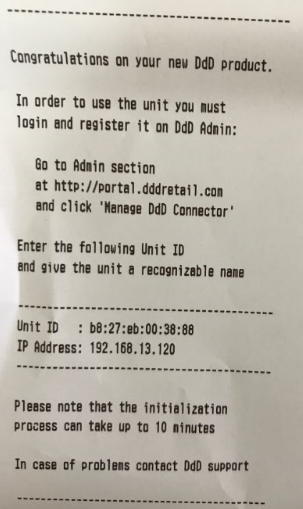
Visit http://portal.k3imagine.com and use the Admin module for the Store that the connector will reside in and configure as per these instructions.
Note: When adding a new connector and configuring it to a store through the Admin portal, it may take up to 10 minutes to complete. When it has finished, you will receive a startup notification printout.
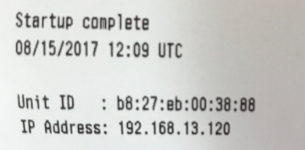
Should the Startup Complete slip print without an IP Address then you should check you network settings and router. A missing IP Address means the connector has not been issued an IP address automatically.